페이지

2014년 7월 31일 목요일

[Sara Nail] Choosing the right hair color that matches your skin color :D

Choose the right hair color for your skin color!
An easy way to change your style is to dye your hair.
Choosing the right hair color is really important because
it could make your skin look darker or lighter.

Let's get to know which hair color matches my skin color!


How do I choose the color?

1. If you want to look calm and intelligent, color your hair with dark colors.
Dark brown, choco brown would be great. If you re-touch your hair with thick waves, you would look more more intelligent!

2. If you want to look cute and lovely, gold colors are good. You would look better if you cut your hair short or perm your hair with C-curl.

3. If you want to look lively and active, dye your hair with orange brown or red brown. I've tried dying my hair with red-wine, and it turned dark brown after 2~3 weeks. Also, be careful not to dye your shirt because red colors let out a lot of red color.

4. If you want to look refined and chic, dye your hair with red color. Dye your hair with red and cut your hair short! Boys would love you!


Choose the right hair color for your skin color

1. Pale skin: Red & orange
If you add brightness with red and orange color to your pale skin, you would look lovelier. Red color would make your skin look clear. Dark red would make you look older, so please mix red and orange together!


2. Yellow skin: Dark brown
Never dye your hair with gold or orange color tone! It will make your face look like you are having a severe jaundice symptoms. No one likes to look like that!
Try something darker and red-color tone. They will make your skin color look more balanced.

3. Dark skin: Red
Red color hair goes well with darker skin tone. Very chic and elegant. If you want to go for yellow color tone, try bright yellow color. 

4. Red skin: Gray & khaki
If you flush to red easily avoid dyeing your hair to red colors. It will make your face a lot more red than it already is! Try to dye your hair with Khaki or brown color tone. 
Medium-brightness hair colors will make your skin look whiter and cleaner.


Click to purchase Sara Nail products! ↓

2014년 7월 30일 수요일

[Sara Nail] What type of clothes suits your body shape?

Fashion Style Depending on Your Body Shape
To be a fashionistar, you first need to know your body shape. Of course, if you're tall and glamorous, you will look great in any kinds of clothes. :D Let's get started on our lesson.


1. Skinny
For those of you who are skinny, wear clothes with ruffles, shuring, huge ribbons, and other clothes with huge decorations. Clothes with huge decorations will make you bigger and fatter. You will look better in A-line skirts than H-line skirts. Wear spangles or sequin accessories. Avoid wearing bangles because it will make your wrist more skinnier.

2. Glamorous
Wear three-quarter-length t-shirts because it will cover up your huge chest. Avoid wearing high-neck or turtle neck shirts.

3. Short
For those of you who are short, wear high-waist clothing. It's better to wear your pants/skirts above your pelvis line because it will make your legs longer. Try to wear same colored shoes and pants/skirts shoes also because will make you look taller.

4. Long upper-body
Wear clothes that emphasizes your waist line. Try to match the colors of your pants and shoes.

Be beautiful with Sara Nail!


Click to purchase Sara Nail products! ↓

2014년 7월 29일 화요일

[Sara Nail] Water Proof Make-up for Water Parks

Water Proof Make-up
Hey guys! Are you ready to go to water parks?
I'm sooo ready!
I'm planning to go to the water park with my friends next weekend
and I'm so excited.
However, I'm kind of nervous because my friends would hate my non-makeup face...
Therefore, I'm planning to wear waterproof makeup
that would make me prettier in the water.

Let's get started.


Base makeup is important in waterproof makeup
Base makeup is important in all makeups, but base makeup is especially important in waterproof makeup because makeup should be attached to our skin.

1. Use a brush when putting skin care cosmetics.
It's better to use a brush when putting skin care cosmetics because the brush makes the cosmetics attach to our face. Use moisture cream and mist so that your skin receives enough moisture.
2. Enhace persistency with primer.
Primer prevents sebum secretion!


3. Put foundation or BB cream with a brush.
After putting on foundation or BB cream with a brush, rub your hands together, and then cover your face with your hands that has heat. It will melt the agglomerated foundation.

4. Use finishing powder.
It will prevent the makeup from smudging.

How to choose waterproof makeup
1. Sunscreen: Use any products that says "Waterproof." Sunscreen will come off when you play in the water for a long time, so put on the sunscreen often.

2. BB cream & foundation: BB cream and foundation will come off when you play in the water if it's not waterproof. I recommend Etude House Pearl Clear Proof Any Cushion.


3. Eyebrow, eyeliner: Strong eyeliners would come off after 2~3 hours of playing in the water. I recommend Tonymoly Perfect Eyes Jell Fit Waterproof Liner.

4. Mascara: There are lots of waterproof mascara products.I recommend Kiss Me Mascara :)


Most of the waterproof products are matt. If you put it on many times, your face could dry up. Play in the water for couple of hours and then come out to dry your face in the sun. Play again, come out, and modify your makeup.


                                                  Click to purchase Sara Nail products! ↓

2014년 7월 28일 월요일

[Sara Nail] Lose weight with GM diet!

Lose weight within a very short period of time with GM diet!
I really wanted to lose my weight and be skinny like Girls' Generation...
But it was all failure failure and failure for me!!! T.T

So this time, I am going to try GM diet.
I heard that GM diet is very effective to lose weight in a very short period of time.
But I'm going to go on a diet starting... next Monday... because I plan to go to my friend's house this weekend and eat Kentucky Fried Chicken! :D

Let's get started on GM diet!

GM Diet Meal Plan
Day 1: Any fruits, except for bananas + 2L (67 oz) of water
Day 2: Any vegetables, except for potatos + 2L (67 oz) of water
Day 3: Any fruits, except for bananas + any vegetables, except for potatos + 2L (67 oz) of water
Day 4: 8 bananas + 600ML (20.3 oz) of milk
Day 5: Beef or chicken breast meat (300g/10.6oz) + 6 tomatos
Day 6: Beef + vegetables (the amount you want)
Day 7: Brown rice or fruit juice + vegetables (the amount you want)


GM Diet is called GM Diet because it was developed in GM company.
GM diet's main point is to eat less.


Day 1: Eat any fruits, except for bananas because bananas have high calories. Most of the fruits have high calories, so I suggest tomatos or watermelons. :)

Day 2: Main purpose is to NOT eat any carbohydrates, so avoid eating vegetables with high carbohydrate. Eat lettuce WITHOUT dressing!


Day 3: Eat any fruits or vegetables except for bananas, potatos, sweet potatos, and sweet pumpkins. 

Day 4: Eat 8 bananas and milk... it seems a bit too much right? Eat 1 banana an hour and you will be full throughout the day. :) You do not have to be concerned with the time you eat when you're doing GM diet, so when you feel hungry, just eat!

Day 5: We can finally eat meat! Put a little bit of salt or pepper :)

Day 6: Eat beef and heated up vegetables or salad.

Day 7: Fill your stomach with carbohydrate (brown rice) and eat fruits or vegetables. If rice seems too boring, eat side dishes with low calories.

NO DRINKING! DRINKING is a road to failure! Eat plenty of water because this meal plan could give you constipation. Also, because GM diet requires you to eat less, don't do it everyday. Do it once a month or something. NO DRESSING AND SUGAR.

Let's go on a GM diet and show off our bikinis this summer :)


Click to purchase Sara Nail products! ↓

2014년 7월 25일 금요일

[Sara Nail] Unique 2-lined French - Luxurious Design!

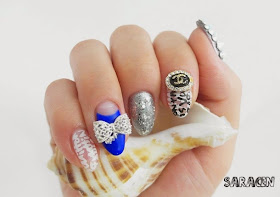
[The Saracen] Do a luxurious nail art design with 2 line French!
Nail art lesson time is finally here! :)
Today, I decided to show you a nail art design that's really popular these days in Korea.
Let's get started on today's lesson.


I added luxuriousness to the nails with ribbon stone and swarovski opal stone set.


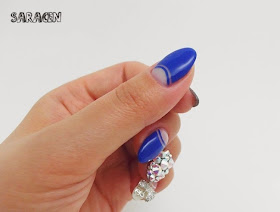
2 line French is really popular these days.
Draw 1 French first, and then draw another thin line with a line brush.
I used Mostiv Line Brush (0.2) to draw this line.


To do silver glitter nail art, you need to put silver nail polish first.
I used Polian 48 silver.
Put silver nail polish first, then put silver glitters on because
the silver nail polish will cover up the empty area that glitters cannot cover.
If you fill your nails only with glitter, your nails will get thicker. 
So PLEASE! don't forget to put silver nail polish first. :)

I put Honey Pot Glitter RX089.


Honey Pot HB27 - His Way of Love


I used Swarovski 001AB Opal Stone Set

1. Put big sized glitter first.
2. Between the big sized glitters, put small sized glitters.

I do not recommend you to put top gel over swarovski because it does not give
a shining effect. :(


2 line French & Full Swarovski Nail Tools

1. Honey Pot Base Gel
2. Honey Pot HB02 Love Letter
3. Honey Pot HB27 His Way of Love
4. Polian 48 Silver
5. Honey Pot HG12 Identity
6. Beaunix Clear Gel
7. Honey Pot Top Gel
8. Mostiv Line Brush (0.2)
9. Hwahong Brush 36
10. Deshing Diva Fast Bond (Stone glue)
11. Honey Pot glitter RX089
12. The Saracen Swarovski 001AB Oval Stone Set 10 different sizes
13. Silver ribbon stone


Click to purchase Sara Nail products! ↓

2014년 7월 24일 목요일

[Sara Nail] Putting nail tips on your nails!

Putting nail tips on your nails!
Transform your short nails into long beautiful nails!
It's raining! Summer monsoon in Korea has finally started!
I hate rain... umbrella's so annoying to carry... :(
How's your weather in your country? :D

Anyways, today, I'll teach you how to put nail tips on your nails!


Ice Gel Clear Oval Full Tips 500pcs
(PLEASE leave a comment OR send an email to ebay@krade.co.kr
if you want Sara Nail products that are posted in this blog.)


1. Nail care
1) Push your cuticles with a pusher.
2) Remove the cuticles with a nipper.


2. Putting nail tips on
1) File the tip with a file to fit your cuticle line. (Round part goes to the cuticle line)
2) Put appropriate amount of gel glue onto the tip. (Just enough!)
3) Push it down, and then stick it onto your nails.
Don't use too much power because it can make air bubbles.
4) After the glue's dry, cut off the tip with the length you want.

3. Caring
1) File the nail tip.


Click to purchase Sara Nail products! ↓

2014년 7월 23일 수요일

[Sara Nail] Check out our new product in eBay! - Honey Pot Gel Nail Polish

Honey Pot Gel Nail Polish HB Series has finally arrived in eBay! (One piece product)

Click below to check out our product :) ↓


2014년 7월 22일 화요일

[Sara Nail] How to dry your nails fast & How to melt solidified manicure :)

How do I dry my nails fast?
and
How do I melt solidified manicure?
I put regular nail polish yesterday, and it took really long for them to dry...
Even though I was really sleepy, I stayed up until midnight and
dried my nails in front of a fan and finally went to sleep.
Therefore, I'm reallly sleepy right now.........:(

Gel nail polish dries really quickly, but regular nail polish colors take about
2~3 hour to dry!

So today, I'll tell you how to dry your nails really fast and how to melt solidified manicure.


How to dry your manicure fast
1. Put the manicure in the freezer
Manicure completely freezes in -70 ºC (-94 ºF). Put the manicure in the freezer for 5~10 minutes, take it out, then apply it to your nails. When the manicure's in the freezer, the molecular mobility of the manicure decreases, therefore leading to fast drying of manicure. Do not put the manicure in the freezer for too long because the bottle can break!


2. Use Quick-Dry products

This is a quich-dry product that quickly dries your nail polish. This product includes quick-dry spray and quick top coat. This product is really convenient because you just need to spray it on your nails. It quickly dries your nail polish, and also gives a shining effect to your nails.

Quick-top coat quickly dries your nail polish, and maintains your nail polish on your nails for a long time.


3. Put your hands in iced water
This method will make your hands reaaaaaaally cold, but it dries your nails really fast :D Put the nail polish on your nails, put top coat on, and put your hands in the iced water for 5 minutes.

Cautions:
   1) Dry your nails for 1~2 minutes before putting your hands in the cold water.
   2) Be careful not to scratch your manicure again ices!


How to melt solidified manicure
1. Put 3~4 drops of acetone in the nail polish
Just put 3~4 dropf of acetone (nail polish remover) in the manicure. If you put too much, manicure color will get lighter. Put a few drops, and then shake well. This method is a temporary method to melt it :( The next day, your manicure will be solidified again... :D


2. Put Sprite in the nail polish
Carbonic acid in the Sprite melts solidified manicure. But do not put Coke or Fanta because it can change the color of your nail polish!


3. Put manicure solvent/manicure thinner in the nail polish
It's called both manicure solvent and manicure thinner. It is a product for liquifying solidified manicure. Put the thinner 20 minutes before using the manicure.
This product is really famous in Sara Nail :D


                                                  Click to purchase Sara Nail products! ↓